
The Paper Bag Princess is one of those stories that holds up no matter how many times you read it. Elizabeth is clever, brave, and completely unbothered by what anyone thinks of her. She makes a great Halloween costume for exactly those reasons. This DIY version is simple, affordable, and takes about half an hour to put together. It also happens to be a costume kids want to wear again after Halloween, which is always a good sign.
I made this costume for my daughter and was genuinely surprised by how well it turned out. It survived a full evening of trick-or-treating and held up through several rounds of dress-up play afterward. Not bad for a paper bag.
What you need to make the costume
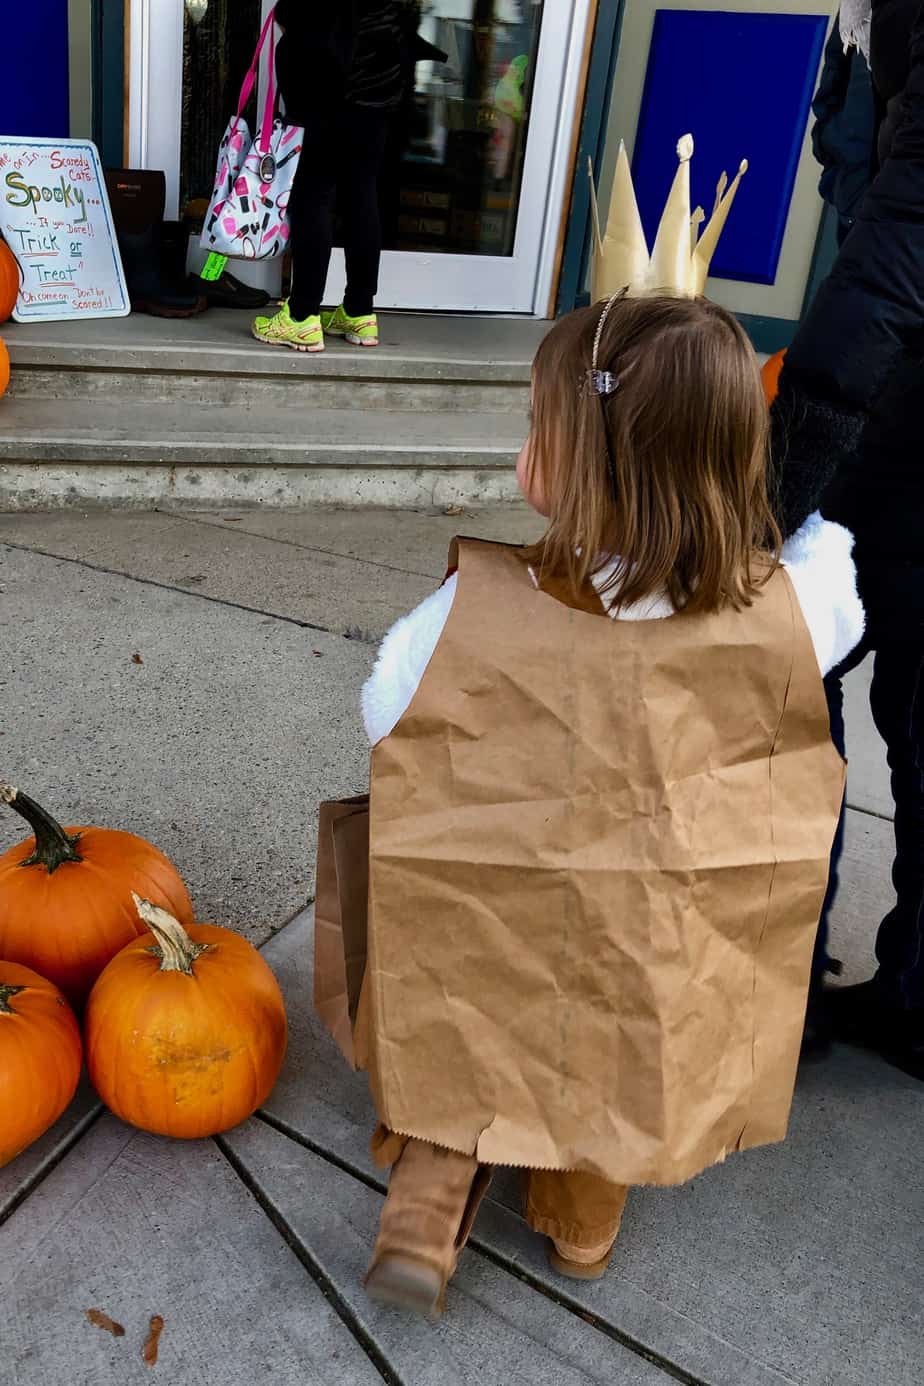
The most important material choice here is the paper bag itself. I used a brown yard waste bag from Home Depot, and I strongly recommend you do the same. These bags are made from two layers of kraft paper, which makes them much more durable than a standard grocery store paper bag. A grocery bag will tear quickly. The yard waste bag will actually last through the night, and then some.
For the crown, you need a clean plastic yogurt container, a headband, some old stickers, and gold metallic spray paint. You likely have most of this at home already. If not, none of it costs much.
You will also need a marker, scissors, and either a stapler, hot glue, or duct tape to take in the sides of the dress.
How to make the paper bag dress
Start by laying the yard waste bag flat. Use a marker to draw a simple neckline at the top and two armholes on the sides. Cut those out. Then hold the bag up against your child to check the length. Trim the bottom if needed. The shape does not need to be perfect. A rough, ragged hem actually looks great on this costume and fits the story well, since Elizabeth famously ends up in a paper bag after the dragon burns all her clothes.
Once the basic shape is cut, have your child try it on. The bag will likely be quite wide. Pinch the sides to bring it in closer to their body and fasten the sides with staples, hot glue, or duct tape. If you use duct tape, apply it on the inside so it stays hidden. Staples are the fastest option and work just fine for a one-night costume. Hot glue holds better if you want the dress to last longer for ongoing play.
You can leave the bag plain, or use markers to add scorch marks and torn edges to make it look more like the one in the book. My daughter loved helping with that part.
How to make the crown
Cut the bottom off a clean yogurt container. Then cut points along the open edge to create a simple crown shape. Stick some old stickers onto the tips of each point for decoration. Attach the crown to a headband using hot glue, and then spray-paint the whole thing with gold metallic paint. Two coats gives a solid coverage. Let it dry completely before your child wears it.
The hot glue connection between the crown and the headband is the part most likely to come loose, so give it a good amount of glue and let it set fully before the big day.
Tips for making it last
The yard waste bag really does make a difference. I cannot overstate how much better it holds up compared to a thin grocery bag. Ours lasted not just through Halloween but for several weeks of play afterward. If you want even more durability, reinforce the armholes and neckline with a strip of tape on the inside before your child puts it on.
Keep the dress loose enough that it does not pull or strain at the seams when your child moves around. A little extra room goes a long way in preventing tears. If a small rip does happen, a piece of tape on the inside fixes it in seconds.
This costume also pairs well with messy hair and bare feet, which is exactly how Elizabeth looks at the end of the story. No tiara, no fancy shoes, just a kid who outsmarted a dragon.
Why this costume works so well
Beyond being easy to make, this costume is genuinely meaningful. The Paper Bag Princess is a story about a girl who uses her wits instead of waiting to be rescued. That message lands with kids in a real way, especially when they get to embody it. My daughter understood exactly who she was dressed as, and she wore that costume with real confidence.
If you are looking for more costume ideas or want to pair this with a related craft activity, there are plenty of options that work well alongside it. A board book version of the story also makes a sweet addition if you want to give it as a gift alongside the costume for a younger child.
The whole project costs just a few dollars and takes less time than most craft activities. If you have a child who loves this book, it is absolutely worth making.


Leave a Reply