
Ice excavation is one of those activities that works well any time of year. In summer, the cold ice is a welcome distraction on a hot day. In winter, the whole thing takes on a different kind of magic. Either way, kids get to practice real science skills while digging out hidden objects from a block of ice. It is hands-on, open-ended, and genuinely fun to watch unfold.
This activity works well for toddlers and preschoolers, but it can be scaled up for older kids too. The basic idea is simple. You freeze small objects inside a block of ice, then give children tools to melt or chip away the ice and uncover what is hidden inside. The process of figuring out how to get the objects out is where most of the learning happens.
If you are looking for more ideas like this, the science for kids section has a lot of great options to browse through.
What you need to make the ice block
You do not need anything fancy to set this up. Start with a container you do not mind potentially cracking. Ice expands as it freezes, so a recycled plastic container or an old food storage tub works perfectly. Do not use anything glass or anything you are attached to.
For the objects inside, choose small items that will hold up in water. Plastic dinosaurs or ocean animals are a popular choice. Letters and number tiles work well too. Pom poms, beads, small figurines, and craft supplies all make fun surprises. Aim for a mix of textures and shapes when you can. The more variety, the more interesting it is to uncover each piece.
To build the ice block, fill your container about one-third full with water and drop in a layer of objects. Place it in the freezer for a few hours until that layer is solid. Then add another third of water and another layer of objects and freeze again. Repeat this process until the container is full. Letting the final layer freeze overnight gives you a solid, dense block that will hold up well during the activity. Layering the objects this way spreads the surprises throughout the whole block rather than clustering everything at the top or bottom.
How to set up the excavation
When you are ready to start, take the ice block out of the freezer and let it sit at room temperature for a few minutes. This makes it easier to remove from the container. Place the block in a bin, tray, or large shallow container to catch the water as it melts.
Before handing over any tools, take a moment to ask the children what they think is frozen inside. Ask them how they think they could get the objects out. This is a good opportunity to introduce simple prediction and hypothesis skills, which are at the core of science activities for preschoolers. You do not need a formal worksheet, but writing down their predictions before you start and checking them afterward adds a nice layer of learning.
Tools to melt and chip the ice
Part of what makes this activity work so well is letting children figure out the tools themselves. Give them some options and let them experiment. If they get stuck, here are some things that work well.
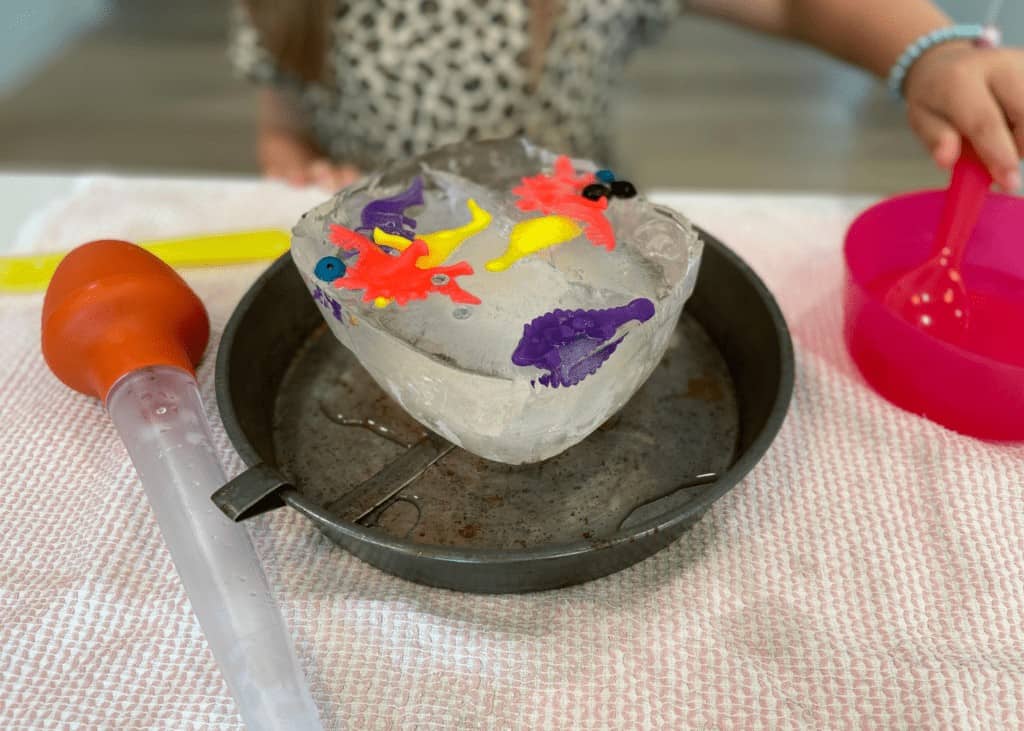
Spray bottles or squeeze bottles filled with warm water are easy for small hands to use and give children a lot of control. Paintbrushes dipped in warm water let kids work carefully around a specific object. A turkey baster is great for directing water into cracks. Spoons can help chip and scrape. A small bowl of salt is a great addition because sprinkling salt on ice causes it to melt faster, which tends to surprise children who have not seen it before.
If you want to add more of a challenge, you can also offer small hammers or wooden mallets for older children who are ready to chip at the ice more aggressively. Always stay nearby when harder tools are in use.
After trying a few different approaches, ask the children which tool seemed to work the best. Ask them what they noticed. This kind of simple reflection is what turns a fun activity into a real learning moment. For more ideas on exploring this concept, the post on what melts ice the fastest is a good companion read.
What children are learning
States of matter
The most direct science concept in this activity is the change from solid to liquid. Children watch ice turn into water in real time. They feel the temperature change in their hands. They see how different tools speed up or slow down the process. This gives them a concrete, physical experience of something that is often only talked about in abstract terms.
Problem-solving
When children realize that one tool is not working fast enough, they start thinking about alternatives. This kind of trial-and-error thinking is valuable. It builds confidence in the idea that problems can be worked through, not just solved instantly. Letting children hit a wall and figure out a new approach is part of the point.
Fine motor skills
Squeezing a spray bottle, controlling a paintbrush, chipping at ice with a spoon, and picking up small slippery objects all require hand strength and coordination. Children are working their fine motor skills the entire time without it feeling like practice.
Sensory development
The cold temperature of the ice, the feeling of water pooling around their hands, the different textures of the objects as they are uncovered, all of this is sensory input. Water play in particular is an easy, low-cost way to support sensory development at home or in a classroom setting.
Adapting for different ages
For toddlers and young preschoolers, keep the tools simple and focus on the sensory experience. Warm water in a spray bottle and a few spoons is plenty. The goal is exploration, not efficiency.
For older preschoolers and kindergarteners, you can introduce more structure. Give them a few different tools and ask them to predict which one will work fastest before they try it. After the activity, talk about what they observed and whether their prediction was right.
For school-age kids, this activity can become a proper STEM challenge. Set up two or three ice blocks and assign each child or team a different set of tools. Time how long each approach takes. Compare results. Talk about melting points and why salt lowers the freezing point of water. This connects well with other simple science experiments for kids that look at similar concepts.
Tips for doing this outdoors in winter
In winter, this activity takes on a whole new dimension. You can freeze your ice block outside overnight if temperatures are cold enough, which saves freezer space and works just as well. You can also experiment with what happens when you pour cold water over the ice instead of warm water. Challenge older children to try to freeze two smaller ice blocks together using only water and the cold air outside. This mirrors what real scientists and researchers deal with in cold climates, and it tends to spark a lot of curiosity.
Doing the excavation outdoors in winter also means the meltwater is less of a concern. The cold air slows the melting slightly, which extends the activity and gives children more time to work through different strategies.
A few practical notes
Plan to get wet. Have towels nearby and dress children in clothes that can handle water and cold. If you are doing this indoors, put a large tray or shallow bin under the ice block to catch runoff. The water adds up faster than you expect, especially once warm water tools are in use.
Do not stress about getting every object out cleanly. Some items will still be embedded in smaller chunks of ice when the main block breaks apart. That is fine. Children can keep working on those smaller pieces, or they can watch them melt on their own, which is its own kind of satisfying.
If you are doing this with a group, prepare a shared bin of tools in the center and let children choose what to use. At home with just one or two children, let them lead the conversation about what to try next.
Getting started
Ice excavation is the kind of activity that looks simple from the outside but holds a lot of depth once children are in it. It requires patience, creativity, and real observation skills. And at the end, there is a collection of uncovered treasures to play with, which makes the whole effort feel worth it.
Freeze the block tonight, and you will be ready to go tomorrow. If you want more activities in this direction, the outdoor learning section has plenty of ideas that pair well with this one.


Leave a Reply