
Melted crayon ornaments are one of those crafts that looks impressive but comes together quickly. You only need a few simple supplies, and it’s a great way to use up broken crayon ends that are too small to color with anymore. The results are colorful, one-of-a-kind ornaments that kids are genuinely proud to hang on the tree.
This craft is part of our collection of 14 Christmas ornament crafts for kids if you’re looking for more holiday making ideas.
What you need to make melted crayon ornaments
The supply list for this project is short. You need old or broken crayons, a cheese grater, clear plastic ornaments, a hair dryer, and an empty box or container to hold the ornament steady while you melt it.
A note on ornament choice: plastic ornaments are the safer option when kids are involved. If you’re doing this craft with a group of adults or older children, clear glass ornaments work beautifully and give the finished piece a slightly more polished look. Heat-protective gloves made for hair drying can also give you more control during the melting step with glass.
Gather everything before you start. Having supplies ready means you’re not hunting for the cheese grater mid-project while also watching a child near a hair dryer.
How to make melted crayon ornaments
Full adult supervision is required for this craft from start to finish. Some materials and tools are not appropriate for certain age groups, so read any instructions that come with your equipment before you begin.
Step 1: Peel the crayons
Remove the paper labels from each crayon so the wax is fully exposed. Most peel off easily. If a label is stubborn, a brief soak in water can help loosen it, though this is rarely needed.
Step 2: Grate the crayons
An adult should handle this step. Use a cheese grater to shave the crayons into small wax pieces. We recommend doing this before the craft session starts, especially if you’re working with toddlers. A cheese grater does not need to be in the room during the rest of the project.
You can mix many colors together for a rainbow effect, or pick a more specific palette. Reds, greens, and golds feel very festive. Silvers, whites, and blues give a wintery look. Either way, about one teaspoon of shavings will give you small spots of color throughout the ornament. A full tablespoon will give you more even, consistent coverage.
Step 3: Fill the ornament
Remove the metal cap from each clear ornament. Most caps pull out with a gentle tug. They sit in a thin wire bracket and come out without much force. Pour your crayon shavings into the ornament, then replace the cap.
Step 4: Melt the wax
Set the filled ornament inside the empty box. The box keeps the ornament from rolling around and keeps hands away from the heat source. Have an adult use a hair dryer to melt the crayon shavings inside.
Crayon wax melts at around 120 degrees Fahrenheit, which is 50 degrees Celsius. Most hair dryers on a medium setting reach that temperature. Check that your hair dryer has a built-in safety temperature regulator. Most standard hair dryers will not exceed 140 degrees Fahrenheit, which keeps things within a reasonable range for this project.
Do not put your hands in front of the hot air. Even at temperatures below 120 degrees Fahrenheit, prolonged skin exposure can cause burns. Let the box hold the ornament in place and direct the air from a safe distance. The ornament will spin and jump a little inside the box as the wax melts, which kids tend to find entertaining to watch from a safe spot.
If your children are very young and you want to keep the hair dryer out of the picture entirely, there are electric crayon melter toys available that work at lower temperatures and are designed with kids in mind.
Step 5: Let it cool
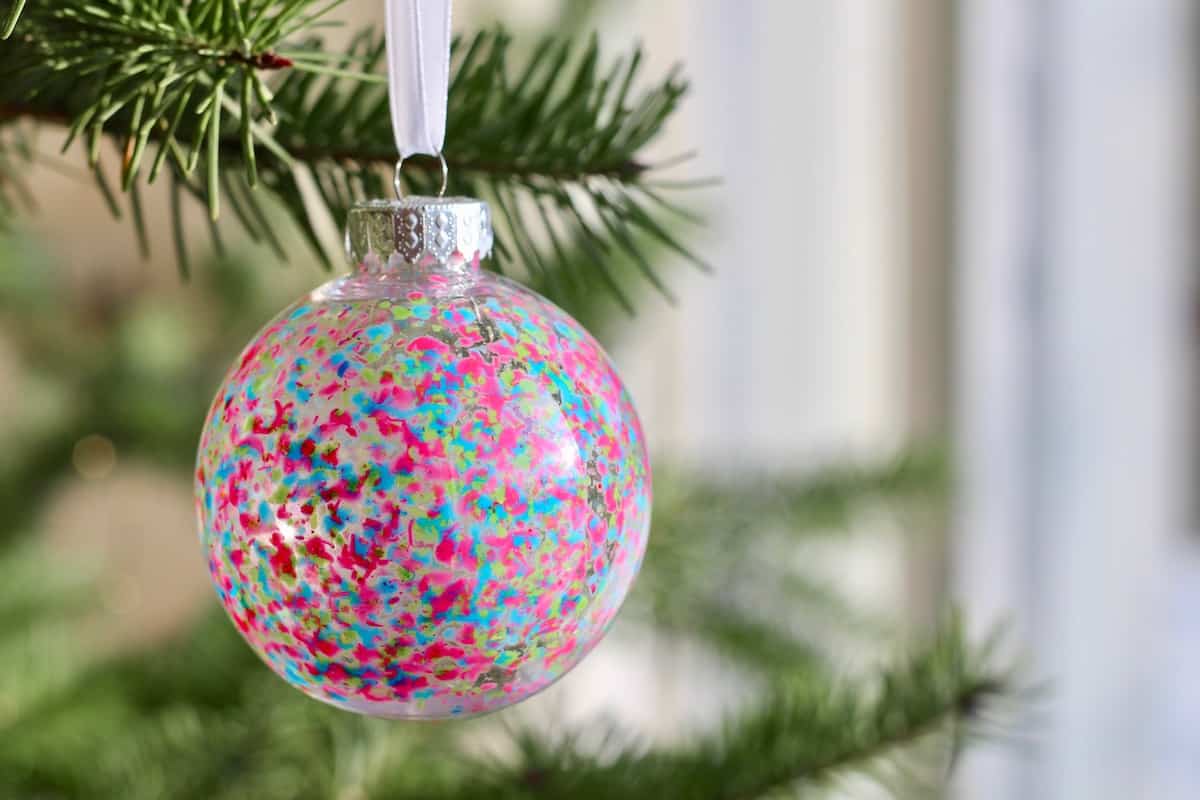
Once the wax has melted and coated the inside of the ornament, set it aside to cool completely before handling. The wax sets back up as it cools and creates a marbled, swirled pattern inside the glass or plastic.
Tips for better results
Rotating the ornament gently while applying heat helps the melted wax spread more evenly around the inside. You can tilt the box or carefully roll the ornament with a tool, just not with bare hands near the heat. Thicker shavings tend to create bolder color pools, while finer shavings give a more delicate, watercolor-like finish.
If you want to add a hanger, tie a ribbon through the cap loop once the ornament is completely cool. A simple loop of twine or satin ribbon works well and keeps the look unfussy.
More ornament crafts to try
If your family has caught the ornament-making bug, there are plenty of other simple projects worth trying. Pom pom star ornaments are soft and beginner-friendly. Piñata Christmas tree ornaments have a great texture and bold color. Clay ornaments are a classic that kids can stamp and shape themselves. Pipe cleaner bead ornaments work well for younger kids who are still building fine motor skills. And if you have pinecones on hand, the pinecone kids ornament is a satisfying one that uses natural materials.
Making ornaments together is one of those activities that tends to produce something worth keeping. These melted crayon ornaments are simple enough to make in an afternoon and hold up well year after year. Once you hang them on the tree, it’s easy to forget they started as a pile of broken crayon stubs.


Leave a Reply