
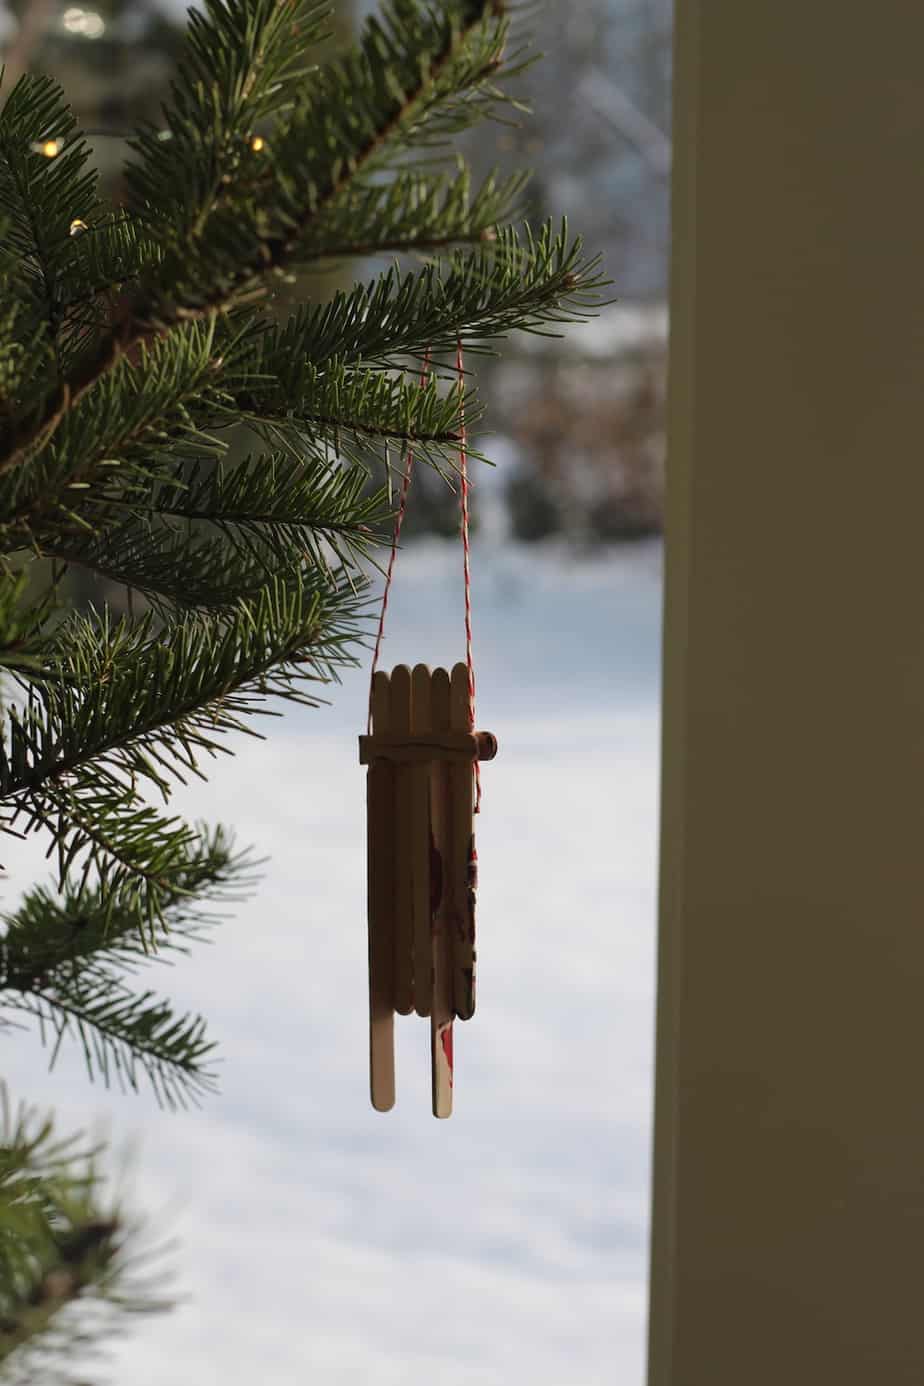
This popsicle stick sled is one of those crafts that looks more impressive than it actually is to make. The finished ornament has real charm on a tree, and kids can take part in most of the steps. It works well for toddlers with help, and older kids can do much of it on their own. You can leave the sleds plain for a natural wood look, or paint them in any color you like.
If you enjoy making ornaments with your kids, check out our roundup of 14 Christmas ornament crafts for kids for even more ideas to work through this season.
What you need
The supply list for this craft is short. You likely have most of these things at home already, or you can pick them up at a dollar store or craft shop without spending much at all.
You will need popsicle sticks, also called craft sticks. Regular-sized ones work well, but jumbo or mini sizes also produce a nice result. The sticks get cut down anyway, so the exact size is flexible. You will also need non-toxic craft glue, string or twine for hanging, paint, and paintbrushes if you plan to decorate. Tacky glue works especially well for this project because it grabs quickly and holds firmly once dry.
Before you sit down with your child, set up a protected work surface and have a paint shirt ready. A responsible adult should handle all cutting and any hot glue gun use. Read the instructions on your glue before you start, since drying times vary and that affects how you plan your session.
How to make a popsicle stick sled
Step 1: Cut the sticks
An adult should cut several popsicle sticks in half before the craft begins. Each sled uses three half-sticks. Cut a few extras so you have spares if anything breaks or if you want to make more than one sled.
Step 2: Build the deck
Count out five popsicle sticks for the top surface of the sled. Four or six sticks also work fine if you want a narrower or wider deck. Lay them side by side on your work surface so they are touching along their long edges.
Apply glue to one half-stick and press it across the five deck sticks near one end. This holds them together. Apply glue to a second half-stick and press it across the other end of the deck sticks. You now have a flat platform held together by two cross-pieces.
Let this dry before moving on. The wait time depends on your glue. Some craft sessions work well split across two sittings, with the deck drying completely overnight before you move to the next step.
Step 3: Add the support and runners
Flip the sled over. Glue the third half-stick across the back of the deck, just behind one of the cross-pieces at the front. This acts as a support brace and gives the sled a more finished look.
Now attach the runners. Apply glue along the thin edge of two full-length popsicle sticks. Press one onto each side of the underside of the sled, running lengthwise like rails. These are what make it look like a real sled. Depending on your glue, you may need to prop the runners in place while they dry. A few books or small blocks on either side work well for this.
Step 4: Attach the hanging string
Before the glue sets completely, tuck a loop of string or twine between the two front cross-pieces and glue it in place. This becomes the hanger for your ornament. Make sure the loop is long enough to fit over a tree branch.
Step 5: Decorate
Once everything is fully dry, the decorating can begin. Leftover craft paint works perfectly here. Kids can paint the deck, the runners, or the whole sled in whatever colors they choose. You can also add small pom poms, glitter, or other embellishments. That said, the plain wood version looks genuinely nice on a tree, so do not feel pressure to add color if the natural look appeals to you.
Tips for doing this with young kids
If you are working with toddlers, keep the steps simple. Let them lay out the deck sticks and press down the cross-pieces with your guidance. Painting is usually the favorite part for young children, and they can take the lead there with minimal help.
Splitting the craft across two short sessions works better than trying to finish it all at once. Waiting for glue to dry in the middle of a craft session is hard for young kids. Doing the building one day and the decorating the next keeps both parts feeling fresh and manageable.
For more hands-on ideas at home, the activities for toddlers section has plenty of options for different ages and skill levels.
More ornament crafts to try
Once you have made a few sleds, you may find yourself with leftover popsicle sticks. They are easy to turn into picture frames for small holiday drawings or family photos. You can also use them to build simple flat shapes like Christmas trees or gift boxes.
If you want to keep the ornament-making going, here are some other crafts worth trying. Pom pom star ornaments come together quickly and use materials most craft drawers already have. Piñata Christmas tree ornaments are a bit more involved but produce a really satisfying result. Children’s clay ornaments are another favorite, especially because they can be stamped with little handprints or names. Pipe cleaner bead ornaments and felt Christmas trees with button decorations are both great for fine motor practice too.
Other options include pom pom ball ornaments, snowman ornaments, paint drip ornaments, alphabet block ornaments, pom pom pinecone ornaments, melted crayon ornaments, and reindeer ornaments. Each one uses simple materials and works well at a kitchen table with kids of different ages.
This popsicle stick sled is a craft worth making more than once. The supplies are inexpensive, the steps are straightforward, and the finished ornament holds up well on a tree year after year.


Leave a Reply