
These children’s clay Christmas ornaments started as a simple afternoon project between my daughter and her Nana. We used Sculpey polymer clay in white, and the results were sweet enough to keep on the tree for years. Clay ornaments are one of those crafts that feel special without being complicated, and they hold up well over time when you use good materials.
If you are looking for a holiday craft that is genuinely enjoyable for kids and adults to do together, this one is worth trying. It fits nicely into a relaxed afternoon, and the finished ornaments look lovely on the tree. We have also rounded up 14 Christmas ornament crafts for kids if you want even more ideas to work through this season.
What you need
The supply list for these ornaments is short. You likely have most of it at home already, and the clay itself is easy to find at craft stores or online.
For the clay, we used Sculpey Premo polymer clay in white. It conditions smoothly, holds detail well, and bakes firm. If you prefer to skip the oven entirely, Crayola air-dry clay is a good alternative. It is soft, easy for small hands to work, and dries on its own overnight.
Beyond the clay, you will need a craft mat to protect your work surface, a small rolling pin or Playdoh roller, and some shape cutters. Cookie cutters work perfectly here. A set of Playdoh tools covers most of what you need, including a roller, cutters, and small detail tools. You will also need a toothpick to poke the hanging hole, a baking sheet lined with parchment paper, and a length of ribbon for hanging once the ornaments are done.
Get everything set out on the table before you bring the kids in. It makes the whole process go more smoothly.
How to make clay Christmas ornaments with kids
Condition the clay first
Start by cutting a small piece from the clay block. One piece about the size of a golf ball is enough for one or two ornaments. Before the kids start shaping anything, the clay needs to be conditioned. This just means working it with your hands until it becomes soft and pliable. Think of it like kneading dough. Roll it, fold it, and squeeze it until it warms up and feels smooth. This step makes the finished ornament stronger and less likely to crack.
Kids can help with this part. Squishing and rolling the clay is satisfying, and it gets their hands warmed up for the shaping that comes next.
Roll and cut the shapes
Once the clay is soft, use the rolling pin to flatten it into an even disc. A thickness of about a quarter inch works well. Go thicker if your kids want more sturdy ornaments. Go thinner if you want more delicate ones, though thin clay can crack more easily at the hanging hole.
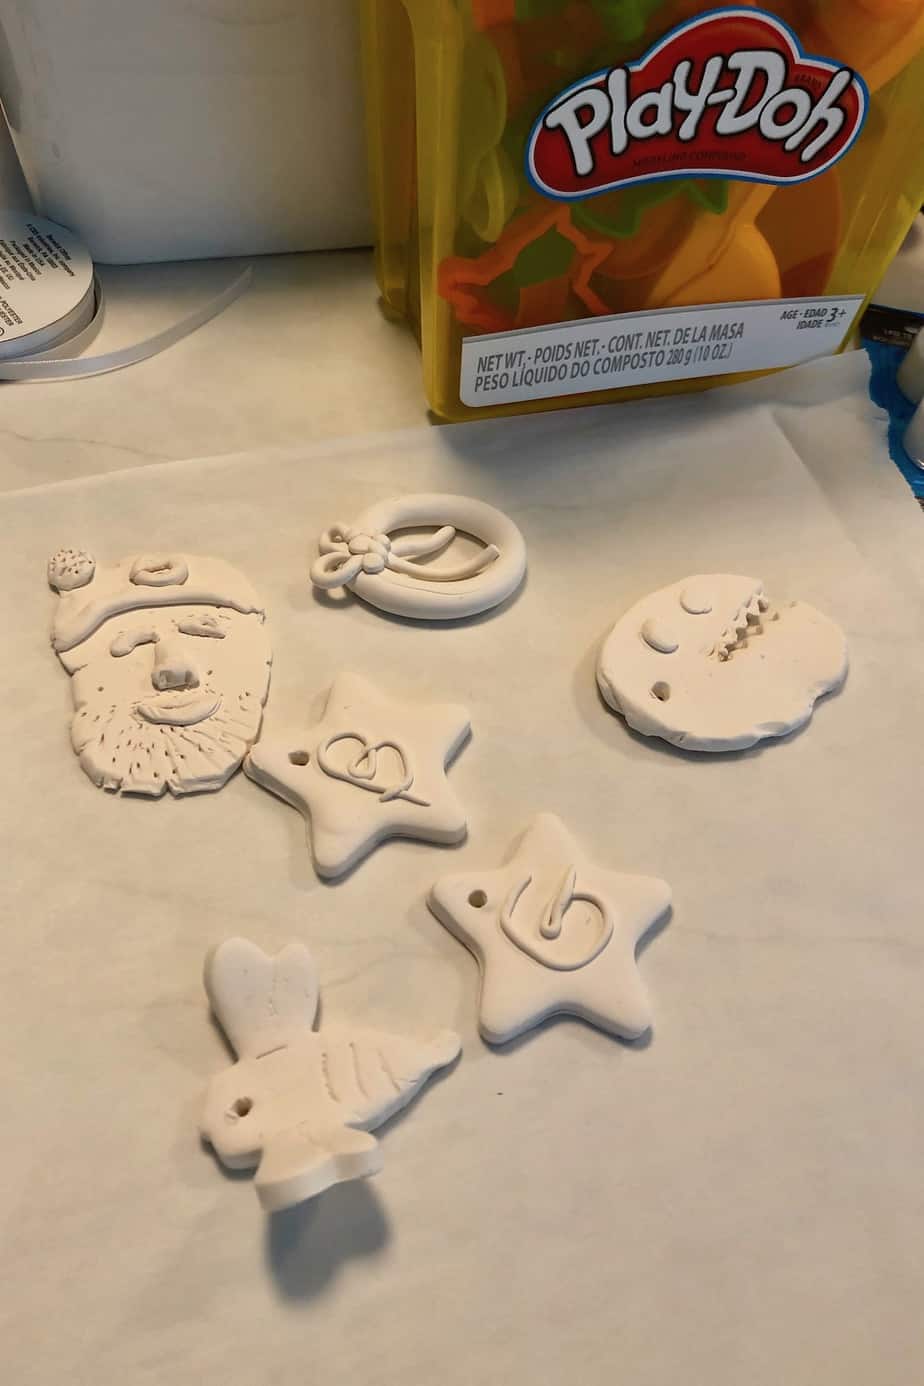
Press a cookie cutter into the clay to cut out the shape. Stars, trees, round baubles, and simple hearts all work well. If your child wants to skip the cutters entirely and shape something freeform, that works too. Some of our favourite ornaments came from free-form shaping rather than cutters.
Use any leftover bits of clay to add texture or small decorations on top of the ornament. Press a small ball of clay onto the surface, or roll thin ropes and press them into swirls. Keep it simple.
Make the hanging hole
Before baking, use a toothpick to poke a hole near the top of the ornament. This is the hole your ribbon will thread through, so make it a little wider than you think you need. Clay shrinks slightly as it bakes, and the hole can close up a bit. A drinking straw works even better than a toothpick if you have one handy.
Place the hole at least a centimetre down from the top edge. Too close to the edge and the clay may crack when you hang it.
Bake and cool
An adult should handle the baking. Place the ornaments on a parchment-lined baking sheet and bake according to the directions on your clay package. Sculpey Premo bakes at 275 degrees Fahrenheit for 30 minutes per quarter inch of thickness. Let the ornaments cool completely before touching them. They will feel soft when they first come out of the oven but firm up as they cool.
If you used air-dry clay, skip the oven entirely and set the ornaments on a flat surface to dry overnight. Make sure they are fully dry before adding ribbon.
Decorate and hang
Once the ornaments are cool and firm, kids can decorate them further if they want to. Paint works well on baked polymer clay. Markers are an easy option for younger children. My daughter coloured hers with markers and was very happy with how they turned out. You can also brush on a little craft glue and add glitter for some sparkle.
Thread a piece of ribbon through the hole, tie it into a loop, and the ornament is ready to hang. Cut the ribbon long enough that the loop sits nicely on a branch without the ornament sitting too low.
A few things that help
White clay shows fingerprints easily during the making process, but most of them smooth out during conditioning. If your ornaments look a little rough before baking, a light smoothing with a damp finger helps.
If you want to make a larger batch, stick to cookie cutters. Freeform shapes are fun, but they take longer. A set of Christmas-themed cookie cutters lets kids work faster and makes the whole project feel more consistent if you are gifting the ornaments.
Working on a dedicated craft surface makes cleanup much easier. A silicone mat or a Gathre mat wipes clean in seconds and keeps the clay from sticking to your table.
More Christmas ornament crafts
If your family enjoys making ornaments together, there are plenty more ideas to try this season. We have made pom pom star ornaments, piñata Christmas tree ornaments, and felt Christmas trees with button decorations. The pipe cleaner bead ornaments are great for younger kids, and the melted crayon ornaments are always a hit. We have also done paint drip ornaments, tiny toboggan ornaments from popsicle sticks, alphabet block ornaments, pom pom pinecone ornaments, snowman ornaments, and a reindeer ornament craft that preschoolers love.
Clay ornaments hold a special place in our collection because they feel handmade in the truest sense. The small fingerprints pressed into the surface, the slightly uneven edges, the careful hole poked with a toothpick by a four-year-old. Those details are what make them worth keeping year after year.


Leave a Reply