
This snowman craft turns a simple LED tea light into a glowing ornament that preschoolers can actually make themselves. It uses pom poms, googly eyes, and pipe cleaners, and the finished snowman lights up right on the tree. The cleanup is minimal, and the whole project takes less than 30 minutes. If you are looking for more ideas like this, we have a full list of 14 Christmas ornament crafts for kids worth browsing.
What you need for this snowman craft
December is a good time to work through the random craft supplies sitting in your cupboards. This project uses basic materials that most families already have on hand, and it gives kids something to put on the tree that they made themselves. The LED tea light is the star of the project. It acts as the snowman’s body, and when you switch it on, the orange glow looks like a little nose from across the room.
Here is what you need to gather before you start. You will need LED tea lights, googly eyes, pom poms in two matching sizes, pipe cleaners, non-toxic craft glue, scissors, a marker, and a piece of string for hanging. Have everything on the table before you sit down with your child. This makes the craft go more smoothly and keeps young kids from losing interest while you hunt for supplies.
A note on markers: a regular kids marker may not write well on the plastic surface of the tea light. Have a permanent marker ready as a backup so the snowman’s mouth actually shows up.
How to make the snowman ornament
Read through these steps once before starting so you can prep any adult-only parts ahead of time. Supervise children throughout the whole project, especially when glue is involved.
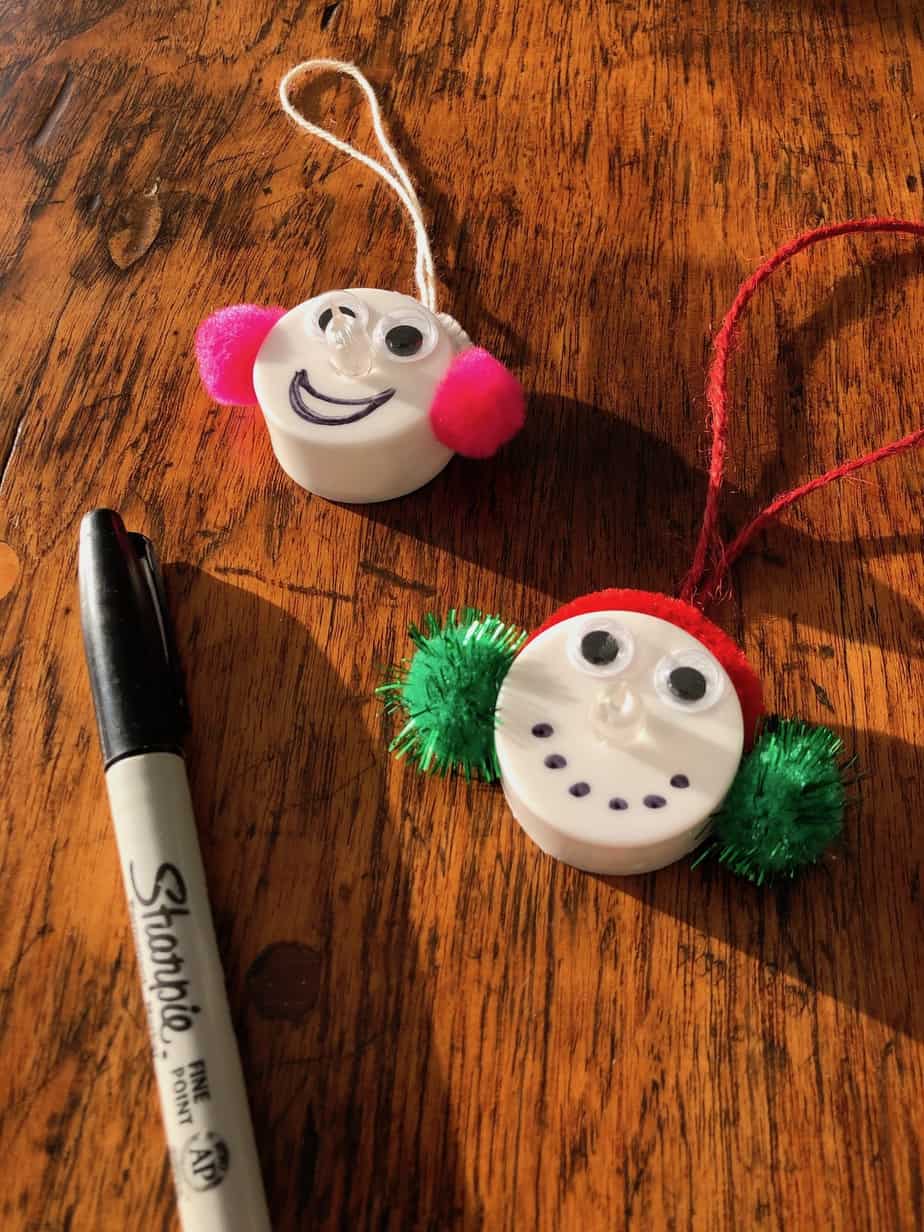
Step 1: Add the eyes
Apply a small dot of glue to the back of two googly eyes and press them onto the front of the tea light. Younger children may need help squeezing the glue bottle. Set the tea light down and let the eyes sit for a moment while you prep the next piece.
Step 2: Make the earmuff headband
An adult should cut a piece of pipe cleaner about two inches long. Bend it into a gentle curve, like a small crescent or arch. This piece will sit across the top of the tea light and hold the earmuffs in place.
Step 3: Attach the headband and earmuffs
Glue the curved pipe cleaner onto the top of the tea light, just above the googly eyes. Then glue one pom pom to each end of the pipe cleaner. These are the earmuffs. Press them gently and let everything sit until the glue sets enough to hold.
Step 4: Draw the mouth
Use a marker to draw a small smile below the googly eyes. As mentioned, a permanent marker works best on the plastic surface. If your child wants to try drawing it themselves first, let them, and then go over it with the permanent marker so it stays visible.
Step 5: Add the hanging loop
Once the glue has dried enough to safely handle the ornament, flip it over. Glue a small loop of string onto the back. Let it dry fully before hanging. When it is ready, the ornament can go straight onto the tree.
Tips for doing this craft with preschoolers
Young children do best when you break the project into small steps and let them work at their own pace. Pre-cut the pipe cleaner before sitting down together. Pre-bend it too, if your child is on the younger side. This keeps the focus on the fun parts, like pressing on the googly eyes and choosing pom pom colors.
Let kids pick their own pom pom colors for the earmuffs. Some children will want a traditional white and black snowman look, and others will go full rainbow. Both are great. The goal is that they made it themselves.
These ornaments also make a thoughtful handmade gift. If you make a few extras, kids can give them to grandparents, neighbors, or classmates. They hold up well and the glowing nose makes them genuinely fun to receive.
If you enjoy making ornaments together, pom pom ornaments are another easy option that use similar supplies. The reindeer ornament craft is also a good one for this age group and works well as a classroom project.
More ornament crafts to try
If this craft sparked some interest and you want to keep going, there are plenty of other simple ornaments worth trying. Pom pom star ornaments use old clear ornaments and loose pom poms, which makes them fast and satisfying. Clay ornaments are a classic that kids can shape and paint however they like. Piñata tree ornaments are a bit more involved but turn out really well. Felt Christmas trees with button decorations are another low-mess option that young children can do mostly on their own.
For something a little different, paint drip ornaments look impressive without requiring much skill. Melted crayon ornaments use a similar technique with crayon pieces instead of paint. Popsicle stick sled ornaments are sweet and use up craft sticks that tend to accumulate in supply bins. Alphabet block ornaments are simple but meaningful, especially for spelling out a child’s name. Pom pom pinecone ornaments bring in a natural element that makes them feel a little different from the rest.
All of these work well for preschool-age children with some adult help, and they give kids something real to contribute to your holiday decorations. There is something genuinely nice about a tree that is partly decorated by your child.
Other snowman craft ideas
If you want to try a few different takes on the snowman theme, there are some good options beyond this ornament. Toilet paper roll snowmen are a simple way to use up cardboard tubes and give kids a larger surface to decorate. Egg carton snowmen work well too, using carton segments, pipe cleaners, and pom poms in a similar way to this project.
For something more sensory, bubble wrap snowman printing is a fun option. Kids press painted bubble wrap onto paper to make the bumpy snowman texture, which most children find very satisfying. Paper plate snowmen are another classic, and they are easy to pull together when you have leftover plates from a party.
If you want to tie in some early literacy, a melted snowman craft with a short poem or story is a sweet way to combine art and language. Kids create a puffy-paint snowman and then talk about what happened to it, which opens up a lot of creative thinking.
Whatever you make, the best part of winter crafting is that the supplies are usually simple and the results end up on the fridge or the tree. That is a pretty good return on a Tuesday afternoon.


Leave a Reply